How to Restore Vintage Hardware
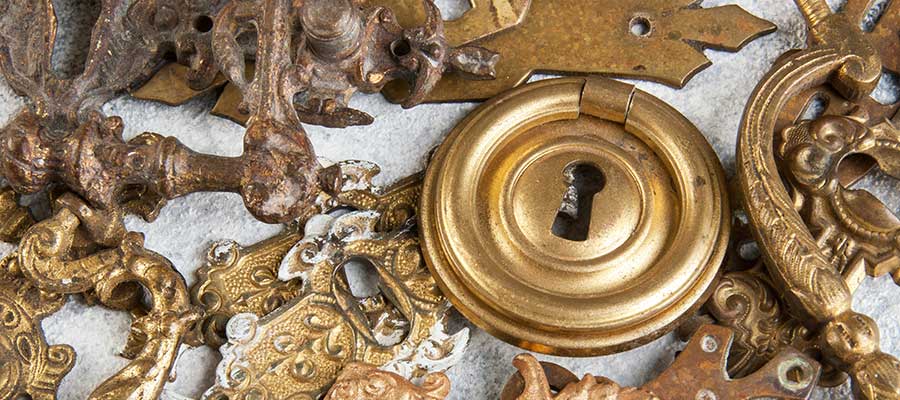
Vintage hardware such as antique and period door knobs, escutcheons, hinges, latches and bathroom fixtures are sought by amateurs and professionals alike to maintain or recreate the decorative ambience typical of late 19 th and early 20th century living quarters. Purists may shun reproductions, instead preferring original period hardware found at flea markets or in establishments specializing in stocking shelves and warehouses with gems rescued from old buildings prior to demolition. More than likely a thorough cleaning is required, which is where an ultrasonic cleaner comes to the rescue.
Ultrasonic Cleaning for Damage-Free Restoration
Beautifully wrought vintage hardware may contain embossing that over the years traps not only dirt and grime but more likely several layers of paint. Conventional cleaning such as using solvents, wire brushes and steel wool is not only unpleasant but also risks damage to softer metals such as brass, bronze and copper or partial or total elimination of plated finishes. Contrast this to the power of cavitation in an ultrasonic cleaner to safely blast away dirt and paint to fully reveal the true artistry of yesterday’s craftsmen.
How Ultrasonic Cavitation Works

Cavitation is the implosion of billions of minute bubbles created by generator-powered transducers bonded to a stainless steel ultrasonic cleaning tank. An example is the 1.5 gallon ultrasonic cleaner capacity Elmasonic EH150EL with an internal tank size of 11.8 x 5.9 x5.9 inches deep. Larger capacities are available. Keep in mind that the unit should be able to accommodate parts being cleaned without crowding, and that the mesh basket holding the parts is slightly smaller than the tank internal dimensions. The EH series operates at 37 kHz or 37,000 cycles per second, an ideal frequency for removing years of buildup on antique decorative hardware. They are equipped with a heater, timer, drain, and sweep frequency. Sweep delivers even distribution of sonic cavitation action throughout the cleaning solution.
Selecting an Ultrasonic Cleaning Solution
Ultrasonic cleaning formulations come in many forms, most of which are biodegradable concentrates. Here are some examples that apply to restoring antique decorative hardware.
General Cleaning: elma tec clean A4 diluted to 2 to 5% with water is your best choice for removing oil, grease, combustion residues, soot and other organic contamination. The optimum cleaning temperature is 50-80?C.
For a Bright Finish: elma tec clean S1 is a deoxidizing cleaner for cleaning and brightening copper and brass alloys and for removing polishing media. Dilute to 1 to 5% with water and clean at 30-80?C.
Paint Removal: Because paint formulations change over the years you may have to do some experimentation. Contact us for information on CLN-STR7-5, a semi-aqueous micro-emulsion that can be used two ways. (1) A pre-wash chemical to safely remove oil and water based paints by lifting them off the metal surfaces or (2) using it full strength in an ultrasonic cleaner operating at about 70?C. Over the long run CLN-STR7-5 is very economical for paint removal because you can filter it time and again to remove paint debris.
A Representative Cleaning Cycle for Vintage Hardware
The operative word here is “representative” because the number and conditions of the parts will govern the length of the cleaning cycle.
Prepare the solution:
1. Add water to the ultrasonic cleaner fill line along with the required amount of cleaning solution concentrate (or full strength in the case of CLN-STR7-5).
2. Turn on the cleaner for about 15 minutes to mix the solution and drive off cavitation-inhibiting trapped air. This step must be done each time you prepare a fresh cleaning solution.
When you are ready to clean:
1. Turn on the cleaner and set the temperature.
2. Place disassembled hardware in the cleaning basket. Try to avoid parts contacting each other. (A fine mesh immersion basket is ideal for smaller parts such as screws and springs.)
3. When the heater light turns off indicating that the set temperature is reached lower the basket into the solution, place the lid on the tank and set the timer for 10 minutes.
4. At the end of the cycle remove the basket and examine the parts. If satisfied, rinse them and allow them to flash dry. Otherwise repeat the cycle.
Cleaning Solution Maintenance
Soils rising to the top of the cleaning solution should be skimmed off and disposed of properly. (See note above regarding maintaining CLN-STR7-5.) When cleaning takes longer it is time to replace the solution. Drain the tank and dispose of the solution according to local regulations. Follow user manual guidance on cleaning the tank, and you’re ready to mix a new batch.
Questions? Call us.


